Action Plans are an important feature of Data Manager. They allow you to set a series of follow up tasks against each Contact that you will perform in the future, such as making a phone call or sending a letter. Action Plans take the stress and uncertainty out of worrying about which Contacts you need to follow up each day and whether you have forgotten to call someone important. As long as you use the Action Plans feature of Data Manager with your Contacts you can focus on your To Do List each day.
Each Action Plan is a series of one or more tasks (phone calls, letters, emails, SMS/TXT messages etc) that you create based on how your and your business handle your customers, suppliers etc. For example you might segment your customers into a number of different categories, such as A, B or C or Hot, Cold or Warm. Each of these categories will have a different series of follow up tasks assigned to them, some with long intervals between tasks and others with shorter intervals between tasks.
Each active Contact in your database should ideally have one or more future tasks assigned to them. Data Manager installs 6 sample Action Plans. These are intended as a guide to show you what a sample Action Plan might look like - you most likely already have your own system for dealing with Contacts that you would rather use. If you are planning to use the Action Plans feature of Data Manager one of the first tasks in setting up Data Manager is to customise the supplied Action Plans.
The standard Action Plans that are provided for you are:
Sample Action Plan
Potential Client 5 Week Contact Action Plan
Potential Client On Hold
Potential Client Hot Prospect Action Plan
Quotation Follow Up Action Plan
Happy Birthday Action Plan
To customise one of the supplied Action Plans:
1. Go to the Data Manager Home Screen.
2. Click the Action Plans button. A list of the supplied 6 Action Plans will appear.
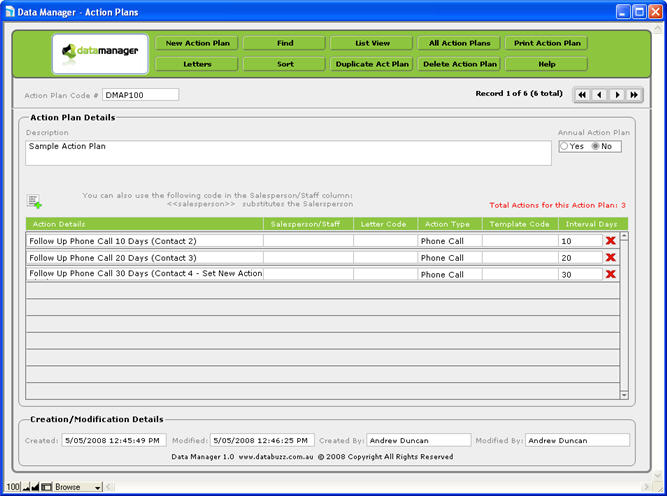
3. Click the Action Plan Details button to the right of the screen to view more information about Action Plan. You will a screen displayed as follows:
This screen displays full details about a particular Action Plan as follows:
Action Plan Code - this is generated automatically by Data Manager and cannot be changed.
Annual Action Plan - select Yes or No to indicate whether this is an Annual Action Plan (the default for new Action Plans is No). An Annual Action Plan sets one task every year on the same date that you nominate - it works in years from the selected nominated starting date instead of days. For example if you wanted to call a Contact every year on their Birthday you would use select Yes for the Annual Action Plan field (see the Happy Birthday Action Plan for an example of this).
Description - a summary that describes the Action Plan.
You can simply edit these fields as required.
The tasks that each Action Plan is comprised of appear in the bottom half of the screen. There is no limit to the number of tasks you can include in each Action Plan. The Action Plan tasks are automatically sorted by the Interval Days so you do not have to worry about entering the tasks in their sequential order
For each task in an Action Plan you can enter the following information:
Action Details - a brief description of the tasks (e.g. "Follow Up Phone Call 10 Days (Contact 2)"). If the Action Type is Email or SMS and you have selected a Template Code the Template Description from the Templates database is entered automatically. If the Action Type is Letter the Letter Description from the Letters database is entered automatically
Salesperson/Staff - the name of the staff member who will be performing the task. You can select from the drop down list of Data Manager Accounts, or alternatively you can enter <<salesperson>> into this field and this will be replaced by the name in the Salesperson field for the Contact that you set this Action Plan against. If you leave this field blank Data Manager will enter the name of the person setting the Action Plan.
Letter Code - if the Action Type is Letter you can select from one of the Letters stored in the Letters database.
Action Type - select the type of Action using the drop down list (e.g. Email, SMS, Phone Call, Letter etc)
Template Code – if the Action Type is Email or SMS you can select an Email or SMS Template from the Templates database using the drop down list. If the Action Type is Email you will only see Email Templates and if the Action Type is SMS you will only see SMS Templates.
Interval Days - the number of days or years from the nominated Action Plan start date you wish this task to appear. For standard/non Annual Action Plans enter the number of days and for Annual Action Plans select the number of Years using the drop down list.
Each of these Action Plans includes a series of one or more tasks that need to be performed in the future after the Action Plan has been set against a Contact. For example the Sample Action Plan looks like this:
|
Action Details |
Salesperson/Staff |
Letter Code |
Action Type |
Template Code |
Interval Days |
|
Follow Up Phone Call 10 Days (Contact 2) |
|
|
Phone Call |
|
10 |
|
Follow Up Phone Call 20 Days (Contact 2) |
|
|
Phone Call |
|
20 |
|
Follow Up Phone Call 30 Days (Contact 4 Set New Action Plan) |
|
|
Phone Call |
|
30 |
The Sample Action Plan includes three actions over a 30 day period as follows:
A Phone Call to the Contact 10 days after your nominated Action Plan start date.
A Phone Call to the Contact 20 days after your nominated Action Plan start date.
A Phone Call to the Contact 30 days after your nominated Action Plan start date.
When you set this Action Plan against a Contact Data Manager will generate three To Do tasks over a 30 day period. See the Setting Action Plans Against a Contact help topic for information on how to set an Action Plan against a Contact.
To add a new Action Plan task click the button with the green plus symbol above the Action Plans heading to add a new blank task then completed the details as required:

To delete an existing Action Plan task click the red x icon to the right of the task you wish to delete:

To create a new Action Plan, simply click the New Action Plan button and fill in the necessary fields and tasks. The Action Plan tasks are automatically sorted by the Interval Days so you do not have to worry about entering the tasks in their sequential order.
To duplicate an existing Action Plan, simply click the Duplicate Action Plan button when you are viewing the Action Plan you wish to duplicate. A copy of the selected Action Plan will be created with a new Action Plan Code and the word "Copy" will be added to the end of the Action Plan description. You can then edit that Action Plan details as required.
To print an existing Action Plan, simply click the Print Action Plan button when you are viewing the Action Plan you wish to print. A preview on the printout will appear on the screen for review prior to printing - click the Continue button on the left hand side of the screen (or press the Enter key on your keyboard) to display a dialog box giving you 3 choices:
Yes - click Yes to print the Action Plan and continue on with print setup and printer settings
No - click No to return to Data Manager
PDF - click PDF to save a PDF file instead of printing (N.B. the PDF feature is NOT available in Data Manager Solo)
If you have a large number of Action Plans you can search the Action Plans database by clicking the Find button at the top of the screen and enter your required search criteria (e.g the Action Plan description of part of the description) and pressing the Enter key on your keyboard. Any Action Plans that match your search criteria will appear. If there were no Action Plans that matched your search criteria you will get an error message.
You can also click the Sort button at the top of the screen to rearrange the order that the Action Plans appear in.