As well as setting an Action Plan against one or more Contacts you can also create a single To Do activity against a single Contact or a group of Contacts. For example if you wanted to schedule a phone call in 7 days time to a Contact you would create a new To Do Activity for that Contact. You can also create a new To Do Activity for a group of Contacts.
To create a new single To Do Activity to a single Contact from your Data Manager Contacts database:
1. Go to the Data Manager Home Screen.
2. Click the Contacts button.
3. Locate the Contact you wish to create the new To Do Activity for and click the Person Icon to the left of their First Name. You will now be viewing the full details for the selected Contact. See the section on Searching the Contacts database for instructions on how to find a Contact.
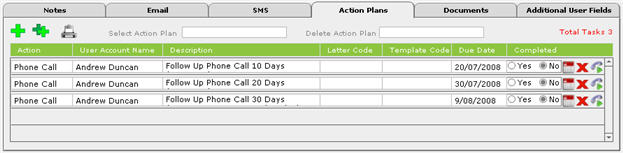
4. Click the Action Plans tab - this displays any To Do Activities/Action Plans previously entered for this Contact:
5. Click the Icon under the Action Plans
tab with the single green plus button  to create a new To
Do Activity for the selected Contact.
to create a new To
Do Activity for the selected Contact.
A new window will appear where you can enter the details for the New To Do Activity:
![]()
This is where you enter the details of the new To Do Activity for this Contact. The fields in this screen are as follows:
Task Due Date: enter the date this new To Do Activity is due to be completed/performed. A popup calendar will appear that you can use to select the required date. This is the date it will appear in your To Do List.
Activity Type: enter the Activity Type. You can select from the drop down value list, for example SMS, Email, Phone Call etc.
Letter Code: if the Activity Type is Letter you can select one of the Data Manager Letters from the Microsoft Word Mail Merge Letters database using the drop down value list.
User Account Name: the Data Manager User Account Name who will be assigned the To Do Activity (it will appear in their To Do List). You can select a User Account Name from the drop down value list.
Template Ref: if the Activity Type is SMS or Email you can select one of the standard SMS or Email Templates using the drop down value list (note if the Activity Type is Email you will only see Email Templates and if the Activity Type is SMS you will only see SMS Templates).
Task Description: this is where you can type in a description for this To Do Activity. Note that if the Activity Type is Letter the Description for the selected Letter will be inserted automatically and cannot be changed. If the Activity Type is SMS and you are using an SMS Template the SMS Template description will be inserted automatically and cannot be changed. If the Activity Type is Email and you are using an Email Template the Email Template description will be inserted automatically and cannot be changed.
Task Completed: this indicates if the To Do Activity has been completed or not. By default this field is set to No. You will generally mark this To Do Activity as completed when it appears in your To Do List and you have performed/completed the activity.
There are also 2 green buttons on the right hand side of the screen that perform as follows:
Cancel: click this to cancel the New To Do Activity and return to the Contacts database
Save: click this to save the New To Do Activity and return to the Contacts database
After you have clicked the Save button you will now see the new To Do Activity that you have just created in the list of Action Plans to the selected Contact. To the right of each To Do Activity are 3 buttons that perform as follows
 - click this button to deleted
this To Do Activity (Once you delete a To Do Activity it is permanently
deleted and cannot be retrieved except from a backup copy that you have
previously made of your copy of Data Manager. See the Backups
section for information on backing up Data Manager). When you delete a
Email Message in Data Manger you are presented with a warning dialog box
confirming that you wish to delete this To Do Activity, allowing you to
cancel the deletion in case you accidentally clicked this button. You
can bypass the confirming dialog box by holding down the SHIFT key when
pressing the delete button.
- click this button to deleted
this To Do Activity (Once you delete a To Do Activity it is permanently
deleted and cannot be retrieved except from a backup copy that you have
previously made of your copy of Data Manager. See the Backups
section for information on backing up Data Manager). When you delete a
Email Message in Data Manger you are presented with a warning dialog box
confirming that you wish to delete this To Do Activity, allowing you to
cancel the deletion in case you accidentally clicked this button. You
can bypass the confirming dialog box by holding down the SHIFT key when
pressing the delete button.
 - if the selected To Do Activity
was created as part of an Action Plan and you would like to change the
due date for this To Do Activity click this button to shuffle the date.
Any other To Do Activities that were set as part of the same Action Plan
that are NOT completed will also be shuffled based on the Interval Days
(see the Action Plans
chapter for more information on creating Action Plans in Data Manager).
- if the selected To Do Activity
was created as part of an Action Plan and you would like to change the
due date for this To Do Activity click this button to shuffle the date.
Any other To Do Activities that were set as part of the same Action Plan
that are NOT completed will also be shuffled based on the Interval Days
(see the Action Plans
chapter for more information on creating Action Plans in Data Manager).
The 3rd button is the button to perform the To Do Activity and changes depending on the Activity Type (if it is NOT one of the below Activity Types this button is blank). You click this button
|
Activity Type |
Icon |
Action Performed when Clicked |
|
Appointment |
|
N/A |
|
|
|
A new blank Email Message to this selected Contact is created. If this To Do Activity included an Email Template the Email Template is automatically inserted. |
|
Letter |
|
The selected Microsoft Mail Merge Letter is opened and you can then perform a mail merge to merge and then print the letter in Microsoft Word |
|
Phone Call |
|
N/A |
|
SMS |
|
A new blank SMS/TXT Message to this selected Contact is created. If this To Do Activity included an SMS Template the SMS Template is automatically inserted. |
|
Task |
|
N/A |
The total number of To Do Activities for the Contact you are viewing also appears on the right hand side of the Action Plans tab in red:


